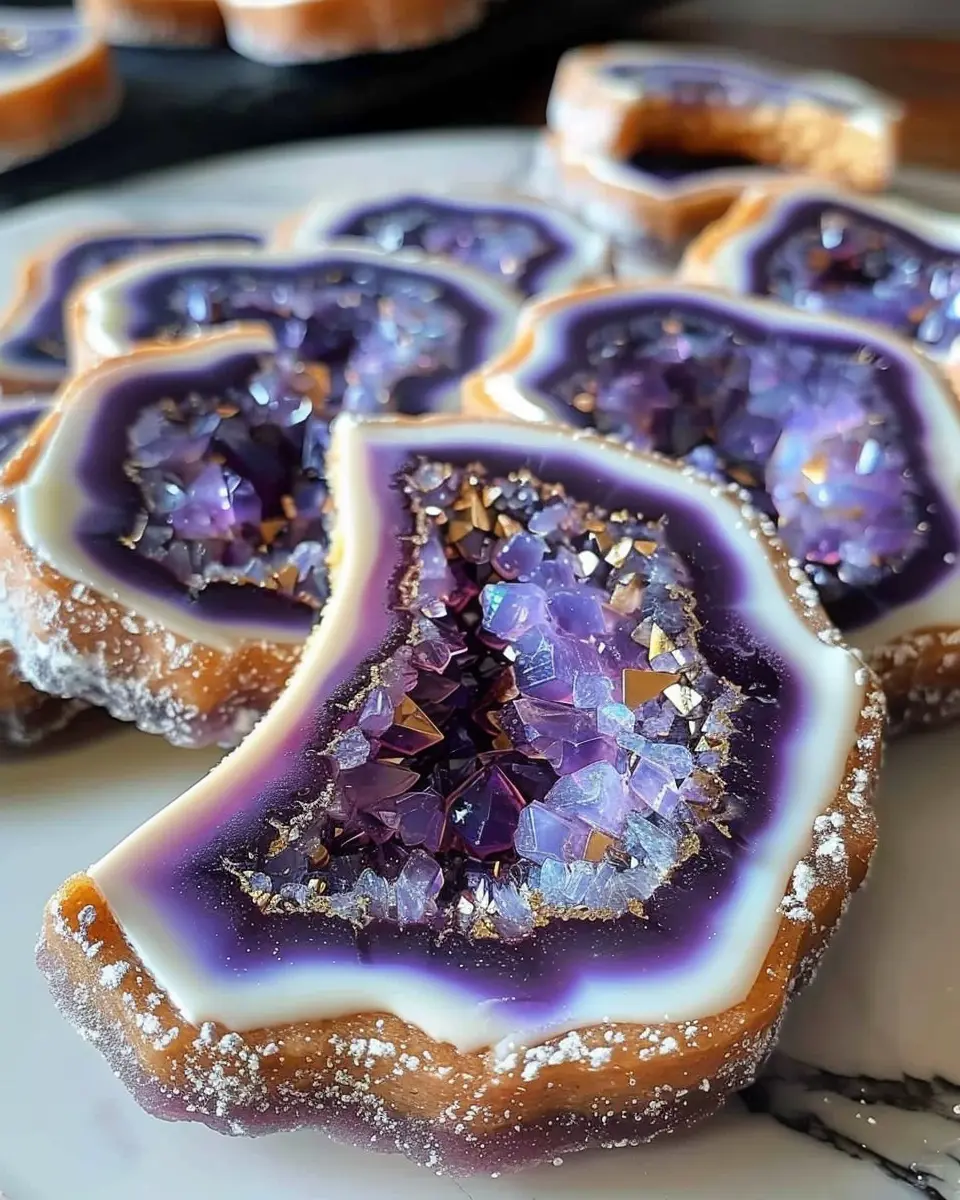
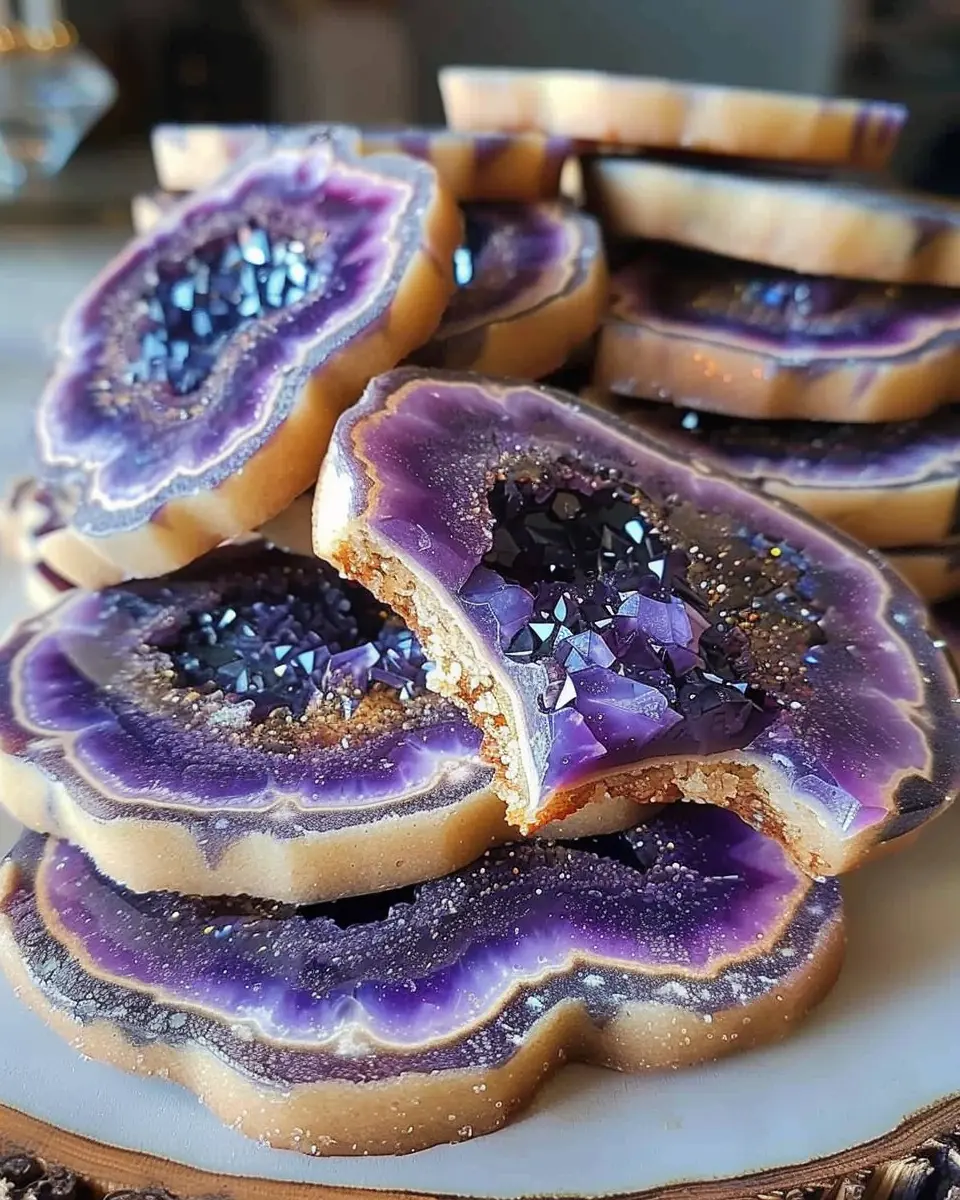
Introduction to Geode Cookies
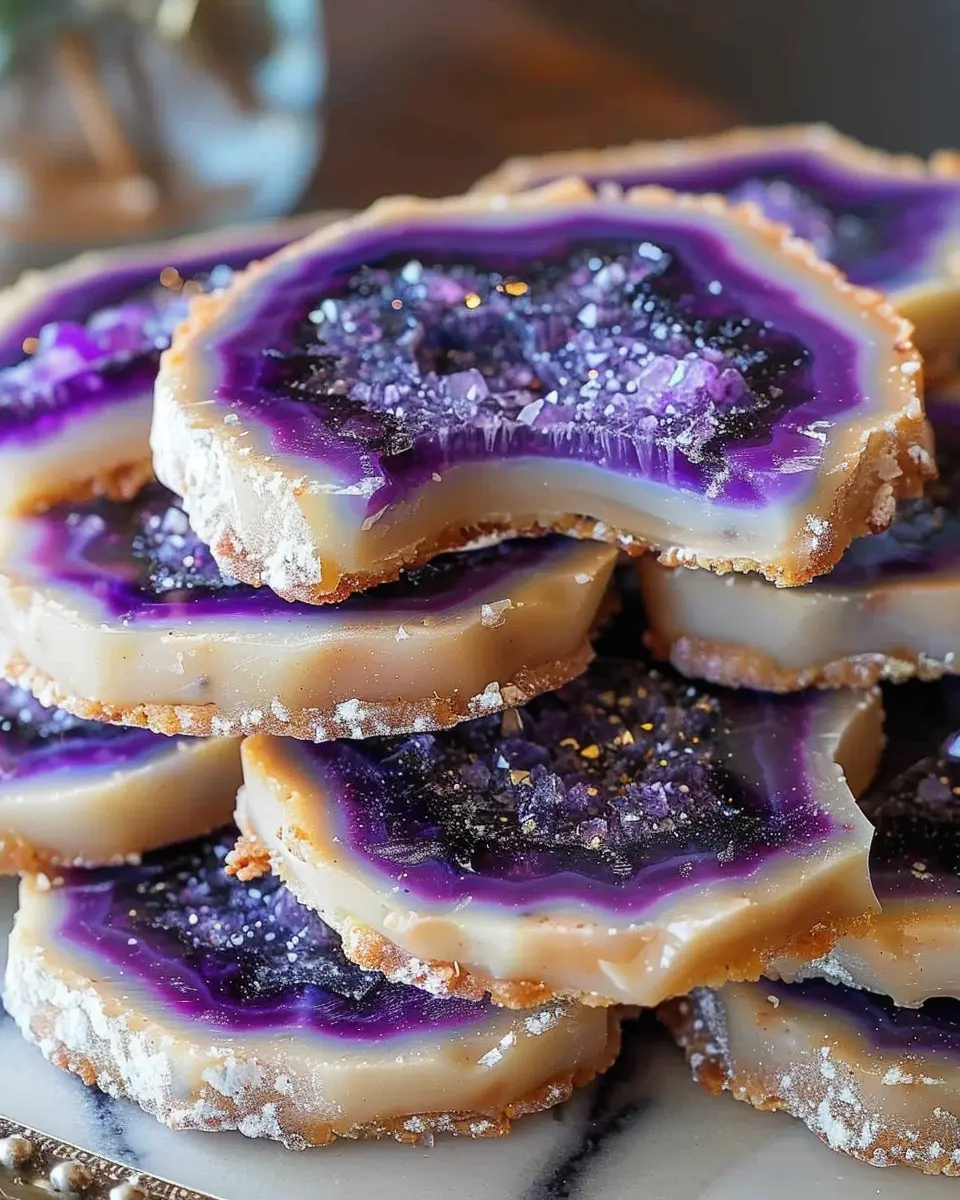
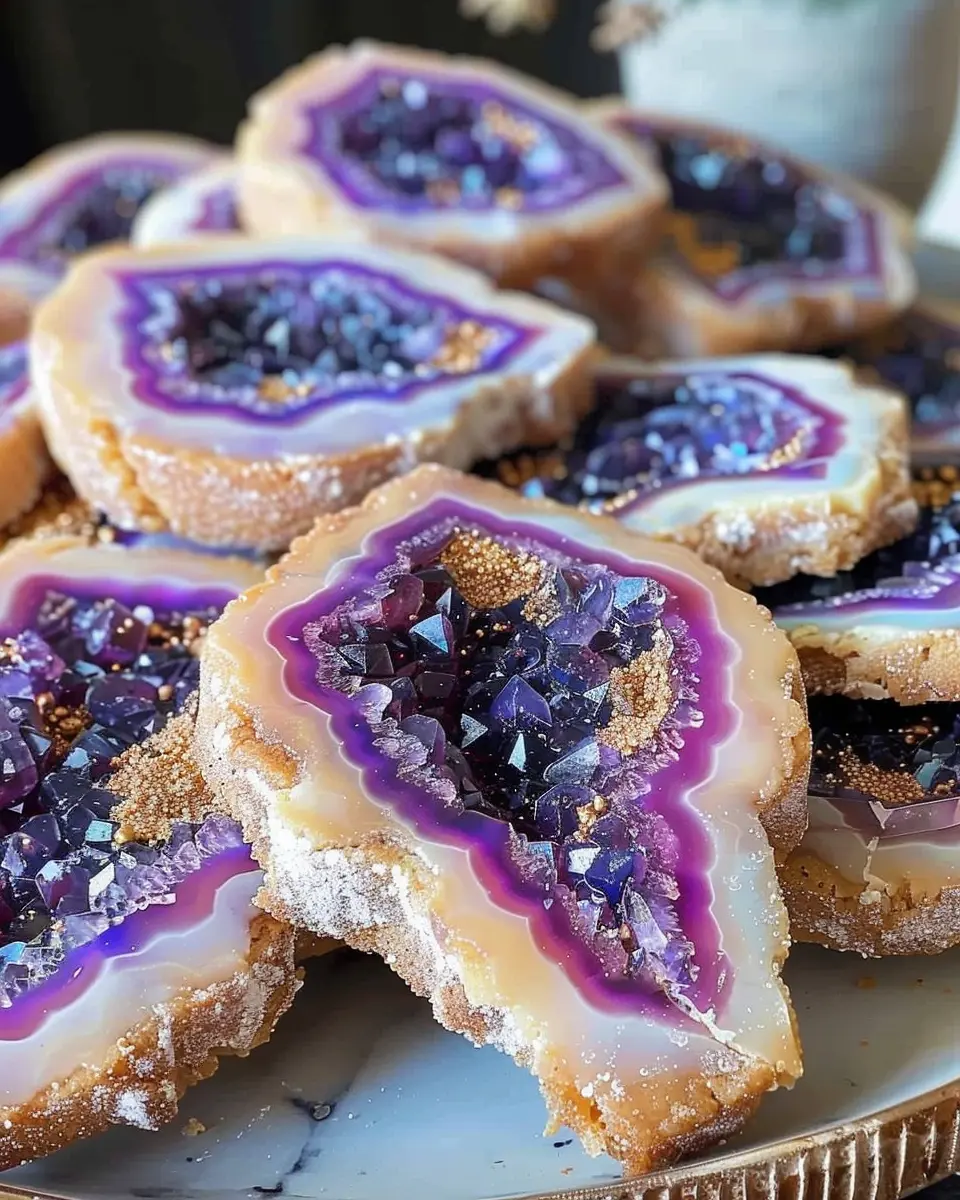
Have you ever seen a dessert that doubles as a stunning piece of art? Enter the world of geode cookies! These visually captivating treats combine the beauty of nature with the joy of baking, making them a standout choice for any occasion. Whether you’re celebrating a birthday, hosting a get-together, or simply want to indulge in something extraordinary, geode cookies are the perfect homemade treat to impress family and friends.
Why Geode Cookies Are the Perfect Homemade Treat
One of the reasons why geode cookies hold a special place in the hearts (and stomachs) of people is their architectural elegance. The vibrant colors and crystalline appearance resemble real geodes found in nature, offering a unique twist on traditional sugar cookies. Not only do they look fabulous, but geode cookies are also flexible. You can customize them with different flavors and colors to match themes or personal preferences.
Moreover, creating these cookies can be a fun bonding experience—perfect for a cozy evening with friends or a fun family baking day. Don’t worry if you’re new to baking; the process is easier than you might think! If you follow this geode cookies recipe, you’ll learn how to make your cookies as beautiful and delicious as they are unique.
As evident from various culinary experts, engaging in activities like baking not only improves your culinary skills but also promotes mental well-being. According to the American Psychological Association, cooking can be a major stress-reliever, allowing you to “unplug” from the hustle and bustle of everyday life.
Plus, think about how wonderful it would be to share these colorful cookies with loved ones. Your friends will rave about your baking prowess, and you’ll have created cherished memories around the kitchen counter.
So, if you’re ready to elevate your baking game and create something truly breathtaking, gather your ingredients and prepare for a cooking adventure. Dive into our upcoming geode cookies recipe section, and embark on your journey toward becoming the star baker at your next gathering!
Ingredients for Geode Cookies
Creating those stunning geode cookies doesn’t just depend on your decorating skills; it starts with the right ingredients. Here’s a detailed look at what you’ll need to whip up a batch of these delightful treats, perfect for impressing friends or enjoying at home.
Basic Cookie Dough Components
- 1 cup unsalted butter: Softened to room temperature, this forms the base of your cookies.
- 1 cup granulated sugar: For a sweet touch that balances the dough.
- 1 cup brown sugar: Adds a hint of molasses flavor and moisture.
- 2 large eggs: Essential for binding the ingredients and adding richness.
- 2 teaspoons vanilla extract: Because every good recipe needs a hint of warmth.
Flour and Colorful Enhancements
- 3 cups all-purpose flour: Ensure the cookies hold their shape while baking.
- 1 teaspoon baking soda: For a little lift in your cookies.
- Pinch of salt: It helps to elevate the sweetness.
For the Geode Touch
- Candy crystals or rock candy: This is where your creativity shines! Use assorted colors for a vibrant geode appearance.
- Edible glitter: Optional, but it adds a magical sparkle.
With these ingredients in hand, you’re just a step away from baking delicious geode cookies. If you want to dive deeper into the science of baking, check out sources like King Arthur Baking for tips on flour types and techniques. Always remember, the joy of baking is as much about the process as it is about the result. Happy baking!
Preparing Geode Cookies
Making geode cookies is a delightful and creative endeavor that combines baking with artistry. These vibrant treats are not only visually stunning but also deliciously sweet. Let’s break down the process into clear steps to ensure you’re well-prepared to make your own stunning batch.
Gather your ingredients
Before diving into any recipe, having all your ingredients at the ready is crucial. Here’s what you’ll need for your geode cookies recipe:
- 2 ¼ cups all-purpose flour
- 1 teaspoon baking soda
- ½ teaspoon baking powder
- ½ teaspoon salt
- 1 cup unsalted butter, softened
- ¾ cup brown sugar, packed
- ½ cup granulated sugar
- 2 large eggs
- 1 teaspoon pure vanilla extract
- Assorted candy crystals (these will be your shiny “geode” pieces!)
Make sure your butter is softened—this makes creaming it with the sugars much easier. You can also get creative with the color of your candy crystals—think about the stunning visual effects you want to achieve!
Mix the dry ingredients
In a medium-sized bowl, mix your dry ingredients first. Combine the flour, baking soda, baking powder, and salt. Whisk these together until they are well-blended. This might seem simple, but mixing the dry ingredients properly is essential for your cookies to rise correctly and have that tender texture we all love.
If you’re curious about the chemistry behind baking, sites like Bakerella offer insightful, entertaining reads on baking science too.
Cream the butter and sugars
Now, it’s time to get working on that delicious cookie base. In a large bowl, beat the softened butter, brown sugar, and granulated sugar together using an electric mixer. You’ll want to whip these until the mixture becomes light and fluffy—about 2-3 minutes. This creaming process helps to incorporate air, giving your cookies the perfect lift.
Add eggs and vanilla
Next, add the eggs one at a time, mixing well after each addition. Then, drizzle in that lovely vanilla extract. This is where the magic happens! You’re adding flavor that will enhance the taste of your cookies immensely. Isn’t it amazing how such a small ingredient can have such a big impact?
Combine wet and dry ingredients
Now, it’s time to unite your dry and wet mixtures. Gradually add the dry mixture to the wet ingredients, mixing until just combined. You don’t want to over-mix here—too much mixing can lead to tough cookies. Lumps are perfectly fine; they’ll bake out!
Fold in the candy crystals
This is where those beautiful candy crystals come into play. Gently fold them into the batter. You want to create the geode appearance, so try to distribute them evenly without breaking them apart; a few chunks left as larger pieces can add to the effect!
Scoop and bake the cookies
Using a cookie scoop (or simply a tablespoon), drop rounded portions of your dough onto a baking sheet lined with parchment paper. Leave enough space for them to spread while baking. Preheat your oven to 350°F (175°C), and bake for about 10-12 minutes. Check for a slightly golden edge while the centers still look soft; they’ll firm up as they cool.
Pro Tip: Allow them to rest on the baking sheet for a few minutes before transferring them to a cooling rack. This helps solidify their shape and maintain their delightful texture.
Now you’re all set to create stunning geode cookies that will amaze your friends and family! Enjoy the process, and most importantly, enjoy the fruits of your labor!
For more tips and creative baking ideas, consider checking out Joy of Baking for additional inspiration. Happy baking!
Variations on Geode Cookies
Colorful Candy Variations
When it comes to the geode cookies recipe, you can truly let your creativity shine. Consider swapping out the traditional rock candy for an array of colorful candies! Here are a few ideas to get you started:
- Jelly Beans: Their glossy exterior mimics real gemstones beautifully.
- Gummy Candies: Use different shapes and sizes for a fun, playful touch.
- Chocolate Rocks: Add a delightful crunch that pairs well with the soft cookie base.
- Sugar Crystals: These can add a shimmering, sparkling effect that elevates your cookies to a whole new level.
Feel free to experiment with these candies to match your theme—think pastel colors for spring or deep jewel tones for a winter soirée.
Gluten-Free Geode Cookies
If you or your friends are gluten-sensitive, don’t fret! Adapting your geode cookies recipe for gluten-free options is simpler than you might think. Start with a high-quality gluten-free flour blend to maintain that soft, chewy texture. Notably, brands like Bob’s Red Mill or King Arthur Flour offer great alternatives that work well in cookies.
- Binding Agent: Consider adding an extra egg or using flaxseed meal for binding.
- Flavor Boosts: Incorporate almond extract or vanilla to keep those comforting flavors intact.
- Toppings: Choose gluten-free candies to top your cookies to ensure everyone can indulge.
Creating these variations not only caters to dietary preferences but also makes your cookies stand out at gatherings. Plus, who doesn’t love a little extra sparkle and color? So roll up your sleeves, invite some friends over, and make it a cookie-decorating party! For more ideas, check out this gluten-free baking guide for inspiration.
Baking Tips and Notes for Geode Cookies
Baking geode cookies offers a delightful opportunity to unleash your creativity in the kitchen. Here are some helpful tips to make your experience a success!
Choose Quality Ingredients
Start with top-notch ingredients. High-quality vanilla extract and pure almond extract will enhance the flavor of your cookie dough significantly. Consider trying organic food coloring for the crystals—it’s more vibrant and free from artificial additives.
Master the Cookie Dough
Achieving the right consistency is key! Make sure your butter is at room temperature before mixing to ensure a smooth, even dough. If the dough is too sticky, chill it for about 30 minutes; this will make it easier to handle.
Perfect Your Crystal Technique
For the geode effect, try using rock candy or sugar crystals in varying colors. They not only look stunning but also give a delightful crunch. Experiment with different shapes and sizes to mimic natural geodes. Want to learn more about the crystal-making process? Check out this insightful guide.
Remember, patience is crucial! Take your time decorating, and don’t hesitate to enjoy the process. Your geode cookies recipe comes alive the more you experiment. Happy baking!
Serving Suggestions for Geode Cookies
Looking to elevate your geode cookies recipe into a show-stopping treat? Here are some creative serving suggestions that will impress your guests and make your cookies the star of any gathering.
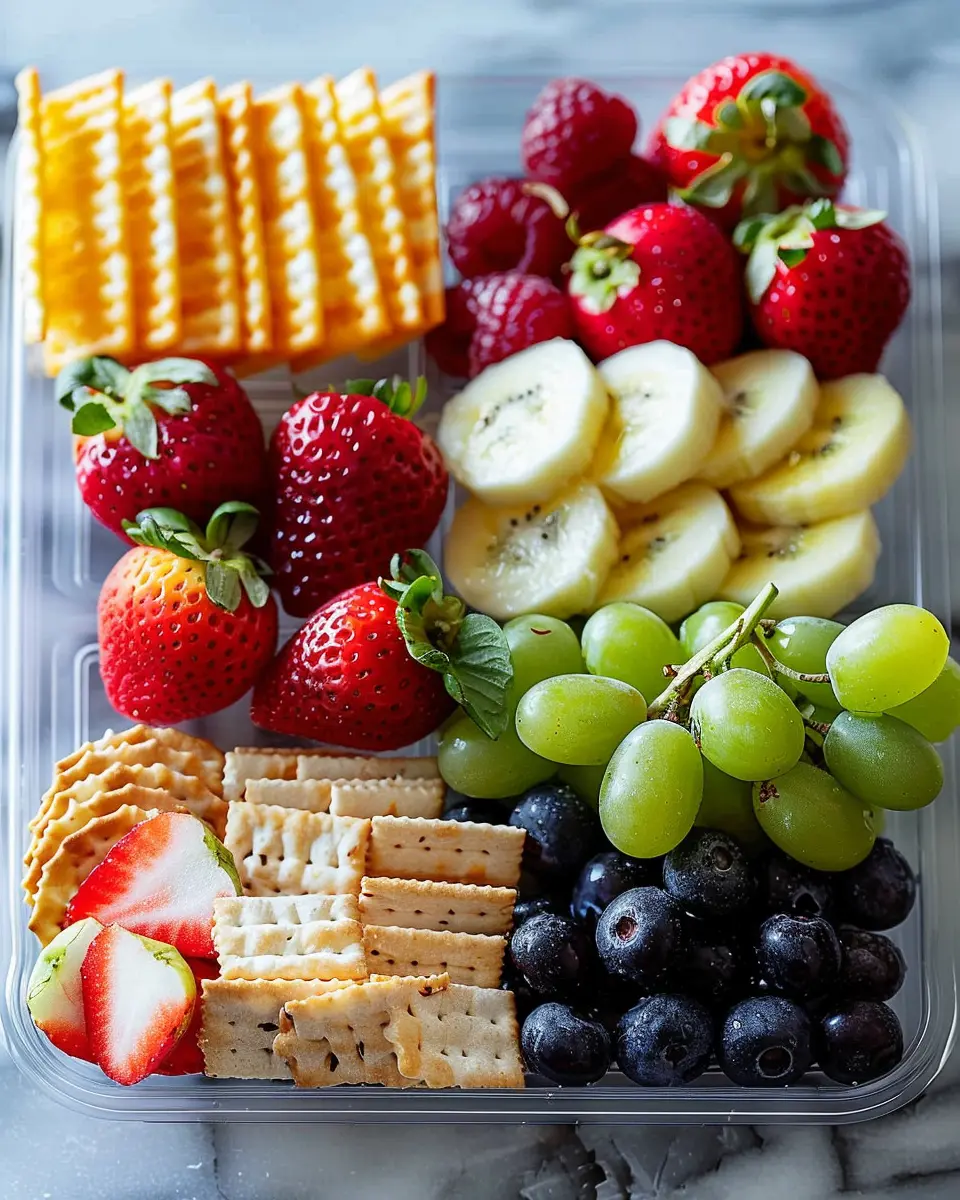
Pair with Fresh Fruit and Dips
Serve your geode cookies alongside a platter of fresh fruit like strawberries or grapes. The sweetness of the cookies complements the tartness of the fruit beautifully. You can also add some yogurt or a sweet cream cheese dip for an extra indulgent touch.
Create a Decorative Dessert Table
Imagine presenting your geode cookies as part of a stunning dessert table! Arrange them on elegant cake stands or platters, mixing in other colorful treats such as macarons or chocolate-covered strawberries. This will not only look visually appealing but also allow guests to enjoy a variety of flavors.
Tea and Coffee Pairings
Pair your cookies with a warm cup of chai or rich hot chocolate for a cozy experience. The chocolate and sugar notes in your geode cookies will harmonize perfectly with these beverages, making it a comforting snack for gatherings or a midday treat.
Gift-Worthy Packaging
Finally, consider packaging your cookies in decorative boxes or bags for a lovely homemade gift. Adding a personal touch with a handwritten note or a recipe card can make this gesture even sweeter, perfect for birthdays or just because.
Elevate your geode cookies recipe experience with these thoughtful serving ideas, and watch as they become a favorite at your next event!
Tips for Making Perfect Geode Cookies
Creating stunning geode cookies isn’t just about getting the aesthetics right; it’s also about mastering your technique and ingredients. Here are some friendly tips to help you nail this geode cookies recipe every time.
Choose the Right Sugar
Start with good-quality granulated sugar for your cookie base. It contributes to a crisp texture, which contrasts beautifully with the dreamy royal icing and edible crystals. For extra sparkle, consider using colored sanding sugar, which adds a lovely shimmer reminiscent of real geodes.
Don’t Rush the Drying Process
Once you’ve decorated your cookies with icing, allow ample time for them to dry completely. This step is crucial for preventing smudges and ensuring your geodes look like they just came from the earth itself. The right drying time can vary, but leaving them overnight is often best.
Inspiration from Nature
Look up real geodes online or in nature. You’ll find a range of colors and patterns, which can guide your design choices. Websites like National Geographic offer fantastic visuals and information about these beautiful formations.
Practice Makes Perfect
If you’re new to cookie decorating, don’t be discouraged if your first batch isn’t perfect. Every baker starts somewhere! Embrace mistakes as learning opportunities.
Experiment with Flavors
While the traditional vanilla is lovely, why not play with flavors? Try adding almond or lemon extract to your cookie dough for a refreshing twist. Your friends and family will appreciate the uniqueness.
With these tips in mind, you’re well on your way to impressing your loved ones with breathtaking geode cookies!
Time Details for Geode Cookies
Preparation time
Getting started on your geode cookies recipe is a breeze, with a prep time of about 30 minutes. This gives you enough time to gather your ingredients and let your creative juices flow as you shape those beautiful cookie bases.
Baking time
Once your dough is ready to go, it takes approximately 10-12 minutes to bake. Keep an eye on them to ensure they don’t overbake; you want a slightly crisp edge with a soft center for that perfect bite.
Total time
In total, you’re looking at around 40-45 minutes from start to finish to whip up these delightful treats. Perfect for impressing friends at a gathering or satisfying your sweet tooth! If you’re interested in creative cookie decorating tips, check out resources like The Cookie Connoisseur for additional inspiration and techniques.
Nutritional Information for Geode Cookies
When indulging in these delightful geode cookies, you might be curious about their nutritional profile. Let’s break it down:
Calories
Each cookie contains approximately 150 calories, making them a sweet treat best enjoyed in moderation.
Sugar Content
With about 10 grams of sugar per cookie, these geode cookies deliver just the right amount of sweetness without overwhelming your palate.
Protein
Featuring around 2 grams of protein per cookie, they’re not a significant source but add a small boost to your snack.
For more detailed nutritional advice, you can check sites like Calories.info or MyFitnessPal to compare with other baked goods as you explore your snack choices. Enjoy your baking journey with these gorgeous geode cookies!
FAQs about Geode Cookies
Can I use different types of candy crystals?
Absolutely! While traditional geode cookies utilize rock candy or sugar crystals for that striking look, feel free to get creative! You can use jelly candies, crystallized ginger, or even edible glitter for a shimmering effect. The key is to choose options that will complement the flavors of your cookie base. If you’re curious about various candy types, you can check out insights on Sweet Treats.
How should I store baked geode cookies?
Storing your beautiful geode cookies is essential to keep them fresh. Place them in an airtight container at room temperature to maintain their soft texture and prevent the candy crystals from becoming sticky. If you plan to enjoy them over a few days, consider adding a piece of bread alongside the cookies to help absorb moisture. This simple trick can keep your cookies fresh for longer!
Can I freeze geode cookies?
Yes, you can freeze your geode cookies! To ensure they maintain their unique appearance, freeze the cookies without the crystals. Just bake your cookies, let them cool completely, and then wrap them tightly in plastic wrap or place them in a freezer-safe bag. When you’re ready to serve, thaw them at room temperature and decorate with your candy crystals. This way, they’ll look as stunning as when you first made them!
Now that you have your geode cookies recipe down, be sure to share your creations on social media or bring them to gatherings—they’re sure to impress!
Conclusion on Geode Cookies
In summary, the geode cookies recipe you’ve just explored promises to be a hit at your next baking adventure. Not only do these cookies look stunning, but they also allow for creativity and personalization—because who doesn’t love a treat that reflects their unique style? They are perfect for parties, special occasions, or simply indulging yourself on a cozy night in.
Remember, the joy of baking lies not just in the finished product but in the process itself. So gather your ingredients, invite some friends over, and enjoy the delightful journey of crafting beautiful geode cookies together. For more inspiration, check out resources like the American Culinary Federation as you hone your baking skills!
PrintGeode Cookies Recipe: Easy and Stunning Treats to Wow Your Guests
Learn how to create beautiful geode cookies that are sure to impress your guests. This easy recipe will guide you through the process step-by-step.
- Prep Time: 20 minutes
- Cook Time: 12 minutes
- Total Time: 32 minutes
- Yield: 24 cookies 1x
- Category: Dessert
- Method: Baking
- Cuisine: American
- Diet: Vegetarian
Ingredients
- 2 cups all-purpose flour
- 1 cup unsalted butter, softened
- 1 cup granulated sugar
- 1 large egg
- 1 teaspoon vanilla extract
- 1 teaspoon baking powder
- 1/2 teaspoon salt
- 2 cups royal icing
- 1 cup edible crystals or sugar crystals
Instructions
- Preheat your oven to 350°F (175°C).
- In a bowl, cream together the butter and sugar until light and fluffy.
- Add the egg and vanilla extract, mixing until combined.
- In a separate bowl, whisk together the flour, baking powder, and salt.
- Gradually add the dry ingredients to the wet ingredients, mixing until a dough forms.
- Roll out the dough and cut into desired cookie shapes.
- Place the cookies onto a baking sheet and bake for 10-12 minutes or until the edges are golden.
- Allow cookies to cool completely before decorating.
- Decorate cookies with royal icing and sprinkle edible crystals to create the geode effect.
Notes
- Ensure cookies are completely cooled before applying icing to prevent melting.
- Experiment with different colors of edible crystals for unique designs.
Nutrition
- Serving Size: 1 cookie
- Calories: 150
- Sugar: 10g
- Sodium: 50mg
- Fat: 7g
- Saturated Fat: 4g
- Unsaturated Fat: 2g
- Trans Fat: 0g
- Carbohydrates: 18g
- Fiber: 0g
- Protein: 1g
- Cholesterol: 20mg
Keywords: Geode Cookies, cookie recipe, dessert, baking